코딩하는 문과생
[Node.js] NestJS & GraphQL 본문
[NestJS]
NestJS를 보면서 가장 크게 느낀 점은 스프링부트와 비슷한 점이 되게 많다는 것이다. Controller와 Service가 있고, DB연결 시 Active Record패턴(entity에 바로 접근)을 이용하거나 Data Mapper패턴(Repository 설정하여 접근)을 사용한다는 점에서 많이 비슷함을 느꼈다. 또한 스프링부트에서 사용하는 어노테이션(@)을 NestJS애서는 데코레이터(@)라고 불리며, 데코레이터를 통해 쉽게 오브젝트와 각 레이어를 정의할 수 있다.
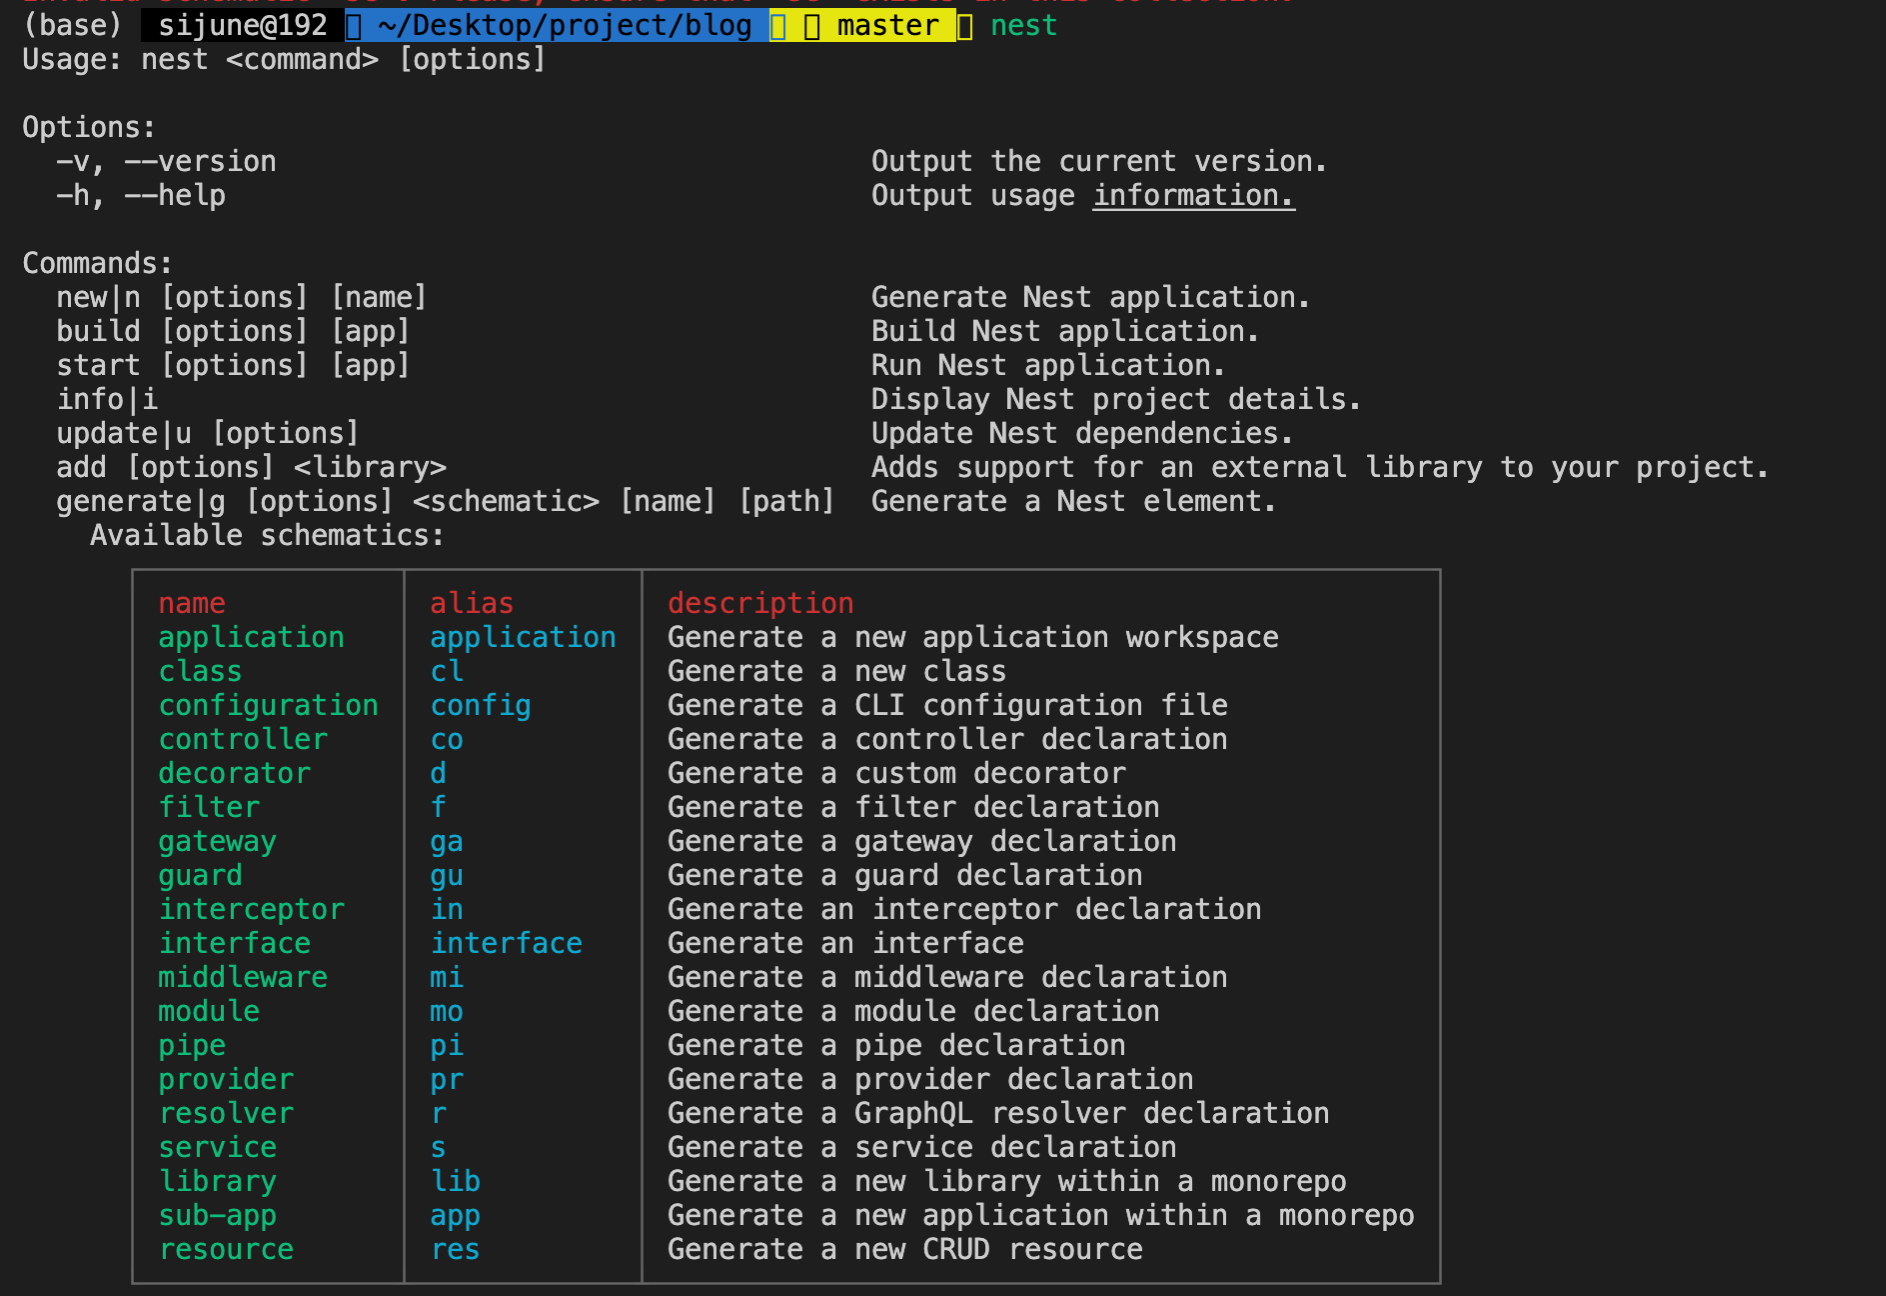
또한 명령어로 쉽게 module, controller 등을 생성할 수 있으며, 그 예시는 아래와 같다.
$ nest g co posts $ nest g mo posts //g: generate, co: controller커맨드 창에 nest라고 입력하면 쉽게 사용법을 익힐 수 있다.

[GraphQL]
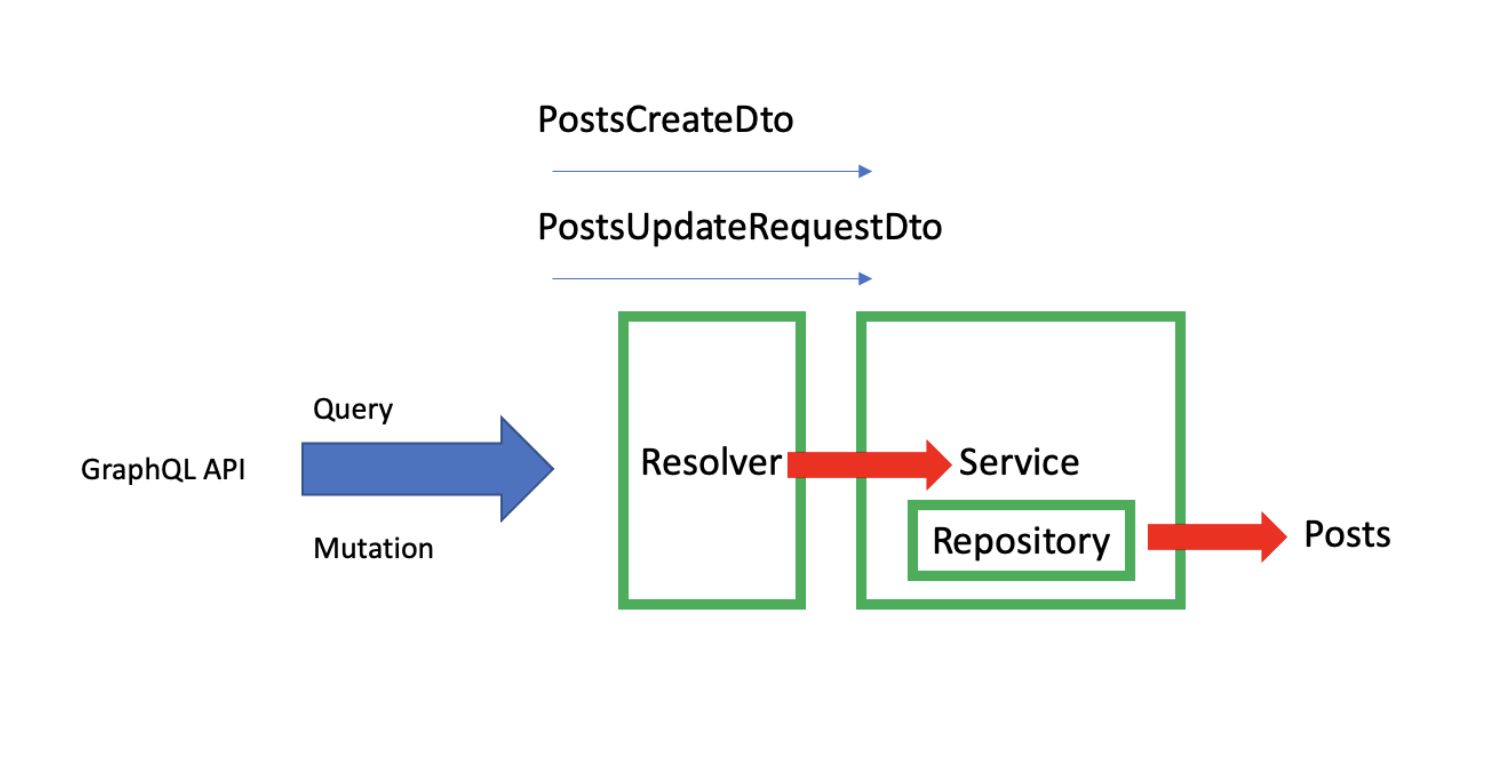
NestJS와 GraphQL이 함께 결합되면 사용법이 조금 특이한데, Controller가 사라지고, 대신 그 자리를 Resolver가 맡는다. GraphQL에서 Resolver란 Query와 Mutation을 제공하는 레이어라고 생각하면 쉬운데, Controller의 역할이 URL와 자원을 받는 역할이라면, Resolver는 GraphQL의 특징인 Query와 Mutation을 받고, 그 결과를 쿼리로 리턴한다.
[NestJS + GraphQL]
전체적인 아키텍처는 아래와 같다.

1. nest JS 프로젝트 생성
$ npm i -g @nestjs/cli //nest cli 설치 $ nest new blog //프로젝트명 blog생성시 패키지매니저로 npm, yarn을 선택하는 문구가 뜨는데 npm을 선택하면된다.
$ code .이후 생성된 프로젝트에 해당 명령어를 통해 vscode를 연다.
2. 프로젝트에서 사용할 App을 생성
이후, entity와 dto를 생성한다. (entity와 dto는 직접 작성한다.)
$ nest g mo posts //module생성 $ nest g r posts //resolver생성 $ nest g s posts //service생성3. 프로젝트 파일

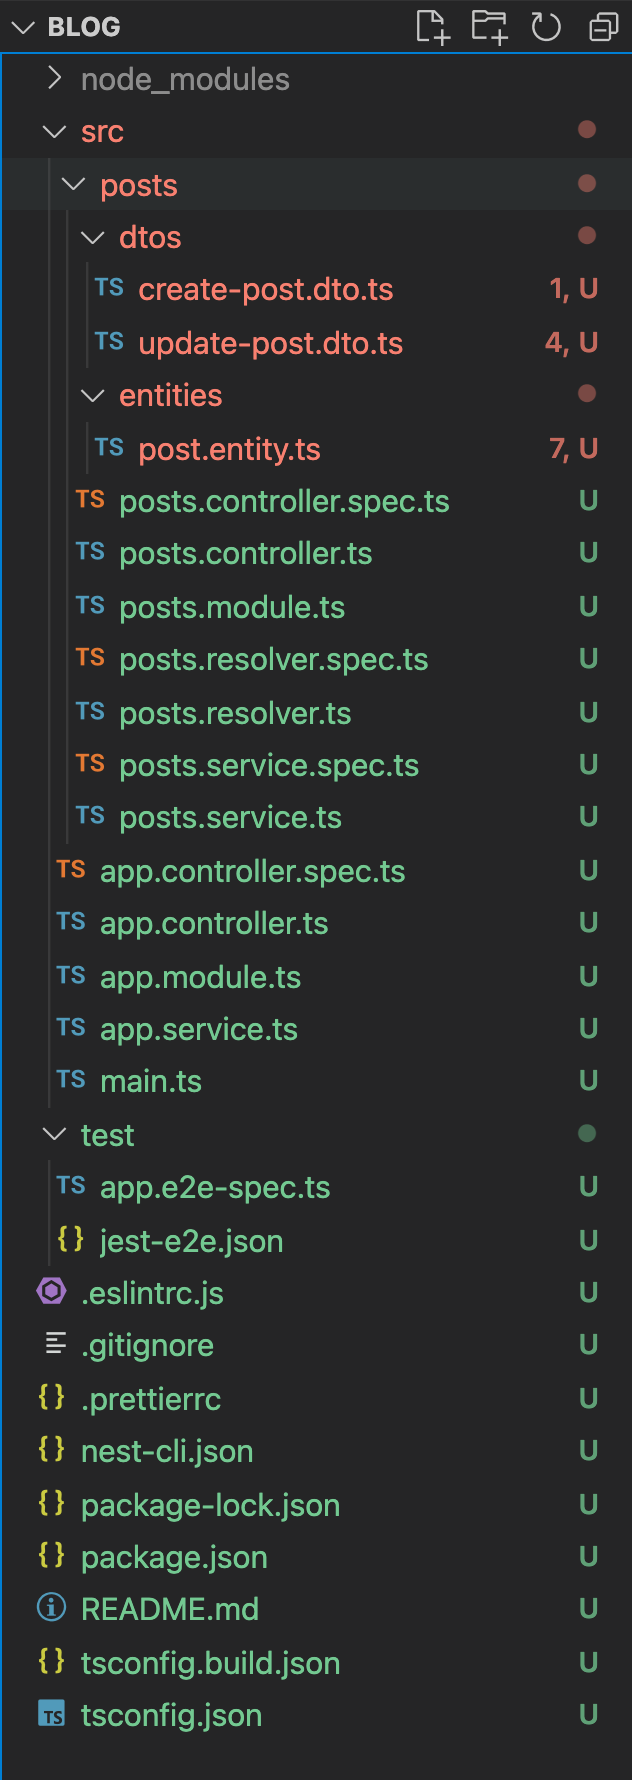
프로젝트를 열면 위 사진과 같이 많은 파일이 생성되는 데 파일에 대한 목적은 다음과 같다.
- main.ts : 서버 구동시 실행되는 파일이다.
- app.module.ts : main에서 유일하게 호출하는 모듈이다. 해당 모듈에 사용하고자 하는 DB연결, 모듈, GraphQL설정을 할 수 있다.
- posts.module.ts : 사용하는 컨트롤러, 서비스 또는 Resolver 등 모듈에서 사용하는 레이어를 정의한다. 해당 모듈을 사용하기 위해서 app.module.ts에 import되어야 한다.
- posts.resolver.ts : query 또는 mutation을 받아 서비스 레이어로 전달한다.
- posts.service.ts : 서비스, 비즈니스 로직을 처리한다.
- post.entity.ts: DB에 생성될 객체를 정의한다.
- create-post.dto.ts : DTO는 데이터 전송 객체로, Resolver에서 Service로 값을 넘길 때 사용한다.
- 그 외: spec.ts는 unit 테스트를 위해, app.e2e-spec.ts는 통합테스트를 위해 사용되는 파일이다.
- main.ts
: 서버 구동 시 제일 먼저 호출되는 파일이다. AppModule을 불러오는 역할을 한다.
import { NestFactory } from '@nestjs/core'; import { AppModule } from './app.module'; async function bootstrap() { const app = await NestFactory.create(AppModule); //유일하게 AppModule만 호출한다. await app.listen(3000); } bootstrap();
- app.module.ts
: 프로젝트의 환경설정을 정의하는 파일이다.
- ConfigModule: 모듈이 로드될 때 설정을 담당, DB 연결 전 설정파일 로드 등에 사용된다.
- GraphQLModule: GraphQL 설정 담당, autoSchemaFile: true 로 설정 시 자동으로 스키마를 관리해준다.
- TypeORMModule: TypeORM 설정 담당, 동기화 또는 로깅 등을 설정할 수 있다.
* Joi 모듈은 Validation을 체크하기 위해 사용한 모듈이다.
* 실제 DB관련 파일은 모두 .env.dev 파일에 저장되어 사용된다.
import { Module } from '@nestjs/common'; import { ConfigModule } from '@nestjs/config'; import { GraphQLModule } from '@nestjs/graphql'; import { TypeOrmModule } from '@nestjs/typeorm'; import { PostsModule } from './restaurants/posts.module'; import * as Joi from 'joi'; import { Post } from './restaurants/entities/Post.entity'; @Module({ imports: [ ConfigModule.forRoot({ isGlobal: true, envFilePath: process.env.NODE_ENV === 'dev' ? '.env.dev' : '.env.test', //NODE_ENV를 package.json에 설정해야 한다. ignoreEnvFile: process.env.NODE_ENV === 'prod', validationSchema: Joi.object({ NODE_ENV: Joi.string().valid('dev', 'prod').required(), DB_HOST: Joi.string().required(), DB_PORT: Joi.string().required(), DB_USERNAME: Joi.string().required(), DB_PASSWORD: Joi.string().required(), DB_NAME: Joi.string().required(), }), }), GraphQLModule.forRoot({ autoSchemaFile: true, //스키마 파일을 메모리에서 관리 }), PostsModule, TypeOrmModule.forRoot({ type: 'postgres', host: process.env.DB_HOST, port: +process.env.DB_PORT, username: process.env.DB_USERNAME, password: process.env.DB_PASSWORD, database: process.env.DB_NAME, synchronize: process.env.NODE_ENV !== 'prod', //모듈과 DB 동기화 logging: process.env.NODE_ENV !== 'prod', entities: [Restaurant], //자동으로 DB에 생성 }), ], controllers: [], providers: [], }) export class AppModule {}
- posts.module.ts
: Post App에서 사용할 레이어를 정의한다.
TypeOrmModule.forFeature를 사용하여 Repository를 쉽게 정의할 수 있다.
* DB에 접근하는 방식은 일반적으로 2가지로 나뉜다.
- Active Record패턴(entity에 바로 접근) - 소규모 어플리케이션에 좋다.
- Data Mapper패턴(Repository 설정하여 접근) - 엔터프라이즈급 어플리케이션에서 사용하기 좋다. Repository를 이용하여 Service 어디에서든 객체에 접근할 수 있다.
import { Module } from '@nestjs/common'; import { TypeOrmModule } from '@nestjs/typeorm'; import { PostsResolver } from './posts.resolver'; import { Post } from './entities/post.entity'; import { PostsService } from './posts.service'; @Module({ imports: [TypeOrmModule.forFeature([Post])], //Post Repository를 사용하기 위한 import providers: [PostsResolver, PostsService], }) export class PostsModule {}
-posts.resolver.ts
: Query와 Mutation을 정의한다.
import { Args, Mutation, Query, Resolver } from '@nestjs/graphql'; import { CreatePostDto } from './dtos/create-post.dto'; import { UpdatePostDto } from './dtos/update-post.dto'; import { Post } from './entities/post.entity'; import { PostsService } from './posts.service'; @Resolver((of) => Post) export class PostsResolver { constructor(private readonly postsService: PostsService) {} @Query((returns) => [Post]) //graphql 영역 posts(): Promise<Post[]> { // ts 영역 return this.postsService.getAll(); } @Mutation((returns) => Boolean) async createPost( //try catch를 사용하기 위해 async 부여 @Args('input') //@InputType 사용시 파라미터명을 정의해야한다. createPostDto: CreatePostDto, ): Promise<boolean> { try { await this.PostsService.createPost(createPostDto); return true; } catch (e) { console.log(e); return false; } } @Mutation((returns) => Boolean) async updatePost( @Args('input') updatePostDto: UpdatePostDto, ): Promise<boolean> { try { await this.PostsService.updatePost(updatePostDto); return true; } catch (e) { console.log(e); return false; } } }
-posts.service.ts
: 비즈니스 레이어를 정의한다. Repository를 이용하여 DB에 접근한다.
import { Injectable } from '@nestjs/common'; import { Args } from '@nestjs/graphql'; import { InjectRepository } from '@nestjs/typeorm'; import { Repository } from 'typeorm'; import { CreatePostDto } from './dtos/create-post.dto'; import { Post } from './entities/post.entity'; import { UpdatePostDto } from './dtos/update-post.dto'; @Injectable() export class PostsService { constructor( @InjectRepository(Post) //entity가 와야한다. private readonly posts: Repository<Post>, ) {} getAll(): Promise<Post[]> { return this.posts.find(); } createPost( @Args() createPostDto: CreatePostDto, ): Promise<Post> { //create or save const newPost = this.posts.create(createPostDto); //create: DB가 아니라 인스턴스 생성(메모리에만 생성) return this.Posts.save(newPost); //실제 DB저장 } updatePost({ id, data }: UpdatePostDto) { this.posts.update(id, { ...data }); //id가 있는지 체크를 안함 } }
-post.entity.ts
:post 엔터티 파일에서 데코레이터를 이용해 GraphQL, typeORM, DTO를 모두 정의할 수 있다.
GraphQL 데코레이터: @ObjectType, @Field...
typeORM 데코레이터: @Entity, @Column...
DTO 데코레이터: @IsBoolean, @InputType...
import { Field, ObjectType, InputType } from '@nestjs/graphql'; import { IsBoolean, IsOptional, IsString, Length } from 'class-validator'; import { Column, Entity, PrimaryGeneratedColumn } from 'typeorm'; @InputType({ isAbstract: true }) //dto 등 확장하는 경우만 사용 @ObjectType() //graphql을 위한 decorator @Entity() // typeORM을 위한 decorator export class Post { @PrimaryGeneratedColumn() @Field((type) => Number) id: number; @Field((type) => String) @Column() @IsString() @Length(5) title: string; @Field((type) => Boolean, { nullable: true }) //graphql @Column({ default: true }) //db @IsBoolean() //dto @IsOptional() //dto content: boolean; @Field((type) => String) @Column() @IsString() author: string; }
- create-post.dto.ts
post 엔터티 파일의 @InputType 속성을 IsAbstract: true로 지정하면 Entity는 @ObjectType이지만 확장하여 DTO를 @InputType을 사용하여 작성할 수 있다.
import { InputType, OmitType } from '@nestjs/graphql'; import { Post } from '../entities/Post.entity'; //@ArgsType() // 하나씩 파라미터를 받게 하고 싶을 때 사용 @InputType() // 전체 DTO를 그대로 넘긴다 export class CreatePostDto extends OmitType(Post, ['id']) {}
4. App 실행
package.json을 보면 다양한 형태로 서버를 구동하고 테스트할 수 있다.

$ npm run start:dev //개발 버전으로 서버 구동
'웹 프로그래밍 > Node.js' 카테고리의 다른 글
| [Node.js] Prisma ORM (0) | 2021.07.20 |
|---|---|
| [Node.js] Apollo Server & GraphQL (0) | 2021.07.06 |


